I wanted to sleep early tonight. So I went to bed just after 10:00pm, slept around 10:30pm, and woke up at 11:00pm!!! Wrestled with my bedsheets for about 45 minutes, and decided that I will not be able to get back to snoozing soon even if I counted a million sheep tonight.
Then images of the Tiramisu ingredients I had in my cupboard started to flash in my mind... or more like, started to haunt me. :) So what do I do? I go and make Tiramisu! Don't worry, I am not going to eat it at this time of the night. It needs to set until morning. :)
I had shared the recipe in Turkish on my Facebook previously, so I thought why not share it in English with step-by-step photos?
The reason I like this recipe is because it is alcohol free, and almost all other recipes I have come across contain some sort of alcohol in it. The Turkish recipes for Tiramisu rarely have it, so it's good. Oh, and I have to say, this is only a try hard Tiramisu, i.e. it's fake. LOL But believe me, it tastes yummoooo.
So let's start with the required ingredients:
For the Syrup:
1 large coffee mug hot water (not boiling!)
1 tb sp milk
1 tb sp nescafe
1 tb sp sugar
For the Creme Filling:
3 tb sp plain flour
1/2 lt milk
2 egg yolks (get rid of the whites!)
1 cup sugar
1 pk mascarpone cheese (250 gr)
1 tb sp vanilla powder
For the Base:
1 pk shortbread sponge finger type biscuits
Once you have all your ingredients, have ready the tray/plate in which you are going to make your Tiramisu, and also an extra plate/tray to moisten the second layer of biscuits.
Lay the biscuits flat. Place the base layer in the tray, and the top/second layer on the extra plate.
Mix the syrup ingredients in the mug.
With a spoon, pour the mixed syrup over the biscuits. Make sure they are moistened well, but you need to be careful not to over do it. :) Remember that you need to pick up each piece and lay it over the base later, so moist enough that the syrup has seeped through the entire biscuit, but not so moist that it melts away. :)) You will know what I mean when you are doing it. It's a very easy recipe!
So all biscuits on both plates need to be moistened.
Now, get a pot and chuck in all the ingredients for the creme filling EXCEPT for the Mascarpone cheese and vanilla powder.
So the above image is what it looks like with the eggs. Ewww, ugly sight for someone like me who can't eat eggs, but trust me, it tastes finger likin' good. :)
I prefer to mix it with a whisk all throughout the process so there are no clumps in the end. I find that if I use the blender, it becomes too... hmmm, what's the word for it?.. bahhhh I can't remember the exact word, but it doesn't get as thick as it should. So try and avoid the blender if you can. I also put my stove to medium-medium high rather than high.
Once it's almost done, this is what it should look like. Nice, thick, and creamy with bubbles plop plop plopping. :)
Now, at this stage, I advise you remove the pot from the stove to prevent the creme from sticking to the bottom of the pot, and start emptying the Mascorpone cheese into the pot and add the vanilla powder too.
Once you have added the Mascarpone cheese, place the pot back onto the stove and probably have your stove down to low at this point, and continue to mix with the whisk for a couple minutes until you see that the cheese has completely blended in to form an even thicker creme.
When that is done, remove the pot from the stove and probably leave it to cool a little bit for approximately 5 minutes. It doesn't need to be cold.
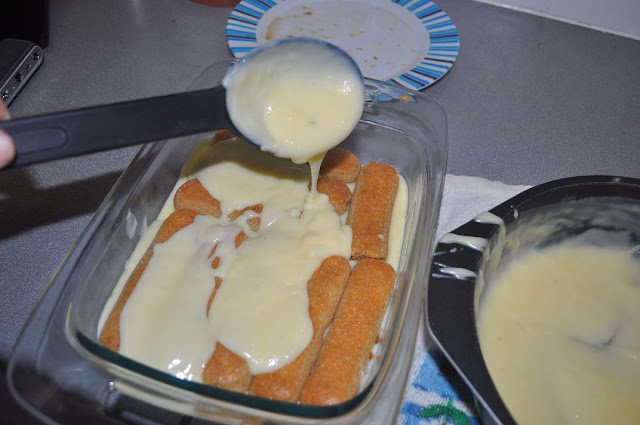
Start pouring the creme onto your base. Make sure all the biscuits are covered in the filling.
Once you have covered the base with creme, start transferring the biscuits that were moistened on the other plate onto your base.
I would recommend that you transfer them with your hands rather than using other utensils, because at this stage they are very prone to breaking. It's ok if they break into two or something, just lay them accordingly. As you can see in the above photo, my middle bikkie broke in half. :)
Once you have completed laying the second layer of biscuits, repeat the same process. Cover the entire layer with the remaining creme.
So it should look similar to this... depending on the type of plate/tray you use.
I prefer to use a deep dish which prevents all the creme from spilling out, because I like my Tiramisu with chunks of creme once it has set. :)
Now, my dish has a cover, so I placed that on it, but alternatively you can wrap it with cling wrap, because now you are going to place it in the refrigerator for it to set. It should be ready to serve in approximately 2-3 hours. The more it waits, the better it sets and tastes. So I usually make my Tiramisu late at night, and it is ready to serve any time during the day. If you are going to make it for evening guests, make it in the morning, and it will be ready in the afternoon/evening.
When it is ready to serve, sprinkle with cocoa powder. This final photo was from my previous Tiramisu, the one I made just now is still waiting to set in the fridge. :)
Bon Appetit!


0 comments:
Post a Comment